IMAGE GALLERY
|
 |
Access the Image Gallery to see all images, objects, and documents used in this lesson plan.
|
View Image Gallery
|
|
|

Lesson Plan 2: Lewis and Clark: Collecting and Preserving Plants
OBJECTIVES
Students will:
- learn the process Lewis used for drying a specimen
- learn how to dry, press, and mount a plant specimen
- learn the basics of creating a plant press for drying and flattening
MATERIALS
OPENING
Students should get out the specimen that they brought to school. Ask students, "How did you carry it to school? Did it get damaged? Is the entire plant included?" Students should discuss various ways they preserved the plants.
PROCEDURE
- Read the following quote: "That the plant specimens survived at all is all the more amazing when you think about the dangers that the explorers faced almost every day."
(Gary Moulton, The Academy of Natural Sciences web site: http://www.acnatsci.org/museum/lewisclark/l&c_herbarium.html)
Ask, "What obstacles do you think Lewis and Clark faced that might have endangered the plant specimens they were collecting?" (bad weather conditions, being on a boat where they might get wet, need to carry specimens while walking over mountains) "How might they have protected their specimens over the course of the expedition, which lasted several years and covered thousands of miles?"
 Distribute the student reading on drying and pressing and have students make a short list of what Lewis did once the plant he collected was ready to be preserved. Have students list the order of his procedure (carried in oilskin bag; laid flat on a specimen page; sandwiched it between pages of blotting material; recorded the collection locality, date, and habitat on the blotter paper; added comment on how American Indians ate or used plants; stacked plants between two boards; strapped the boards together) Distribute the student reading on drying and pressing and have students make a short list of what Lewis did once the plant he collected was ready to be preserved. Have students list the order of his procedure (carried in oilskin bag; laid flat on a specimen page; sandwiched it between pages of blotting material; recorded the collection locality, date, and habitat on the blotter paper; added comment on how American Indians ate or used plants; stacked plants between two boards; strapped the boards together)
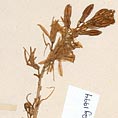
- View images of Lewis's plant specimens and their labels written by Lewis.
- Teacher will model drying, pressing, and mounting (with Elmer's glue) of a plant specimen, connecting the process to the steps Lewis used.
- Students will fill out Plant Data Sheet for their specimen and then dry their specimen in newspaper. Instruct students to place specimens in newspaper inside two pieces of cardboard and wrap rubber bands around them for pressure.
Note: It is possible to place the specimen between several sheets of newspaper and then stick it inside a heavy book for pressing if you don't make a plant press. Be sure students place their names on the newspaper on the outside so that they can locate their specimens.
CLOSING
Question, "Write a journal entry describing how you collected and began to dry and press your specimen. Your audience is someone who wants to learn the process. How did the process go for you? If you don't feel it was successful, try again at home, and bring back your specimen tomorrow, drying inside folded newspapers and clipped together."
SUGGESTED FORMATIVE ASSESSMENT
Check:
- accuracy of information on the plant collection sheet
- student bringing in a specimen in good condition and drying it appropriately
- student self-assessment for how the process is going for them
[PRINTABLE VERSION]
|
|